


Hello there world.
Today I start a new series called 'How to do stuff' which will contain easy and needful tutorials on basic stuff any of us will need on their road as a software engineer and in life.
In todays post we will talk about Checksums.
- First we will answer the question what Checksums actually are
- Second we will talk about for what Checksums are used
- And last we will code a program that helps us calculating Checksums
So let's get started.
What are Checksums?
To understand what Checksums are we need to look at the field they are mostly used in which is Information Security. Information Security is a huge field of informatics about which we all should have heard of and should know a little bit about. Information Security has three main goals.
These are to ensure the following in our world:
- Confidentiality (Privacy of data)
- Integrity (Correctness and Undamagedness of data)
- Availability (Accesanility to data and information of all kind)
The Checksum helps us ensure the Integrity of a file or data in general because it is unique for exactly the file (data) it was created on. Shortly the Checksum is a value calculated out of a file (data) with so known Hash-Functions. Hash-Algorithms or Hash-Functions are mathematically one-way-functions. Under these functions we basically understand a function where you can calculate for the same value x always the same result y as normally in functions but you cannot re-calculate x out of y and the function itself. Every data gets even only with a slight difference to each other a totally different Checksum. So someone could describe it like the fingerprint of a file. There are many different Hash-Algorithms that can be used. The most common are the Message-Digest Algorithm 5 (MD5) and the Secure-Hash-Algorithm-256 (SHA-256). But there are also a lot of different types so you will also hear something from SHA-1 and a lot more. If you are interested in learning more about them there are many different academical sheets you can read to Hash_algorithms in the web. Just search for them.
What usage do Checksums have?
Checksums are used to ensure the Integrity one goal of Information Security. Because of the fact that the Checksum is unique for every piece of data it can be use to see if any data has been changed or damaged.
Maybe it is more understandable with an example:
If you go on the official site of (Kali Linux) and navigate to Downloads you will find something looking like this.

Next to the download button you will see a button with the text "sum". When you click on this button the site will show you the Checksum of the data you can download there:
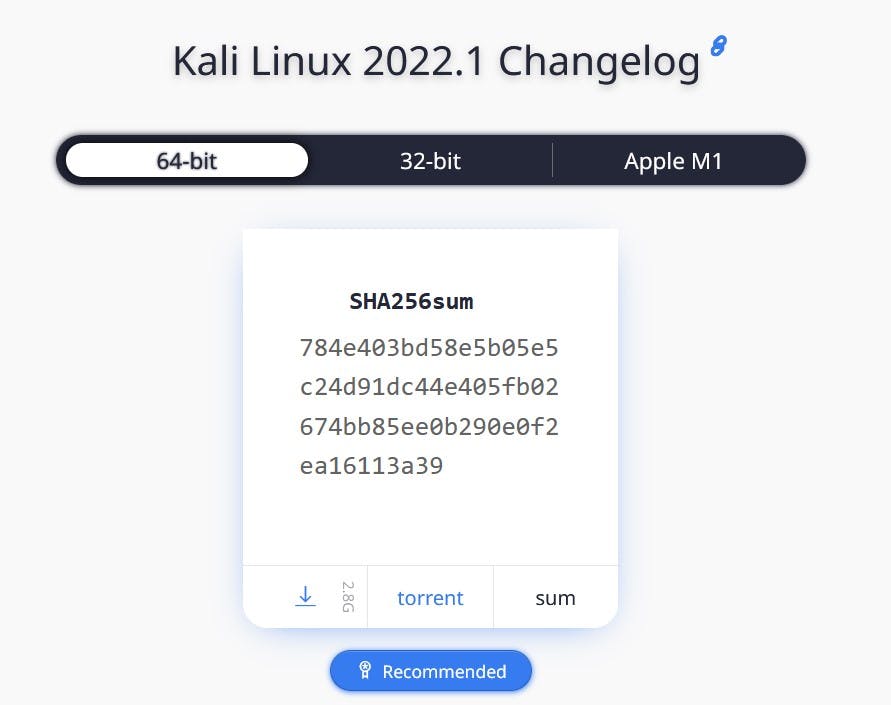
In this picture we can see that Kali uses the SHA-256-Algorithm to calculate the Checksum of its data which is pretty secure. Now many things can go wrong from the point someone clicks on download till the data is downloaded. So if you wanna see if your data you just downlaoded is damaged or even has malware you can just calculate the Checksum of it and compare it to the Checksum Kali has written is the Checksum of the data. If it is the same then congrats everything is fine. You actually downloaded the data you wanted. If the Checksums are not the same and you used the same Hash-Algorithm as writte nthen the data has a problem and you should get rid of it.
So that was shortly the usage of Checksums and do not forget don't use Hash-Algorithms to easy, use something like SHA-256.
Calculating Checksums with Python
How do we calculate the Checksum in Python. Luckily we do not need to implement complicated Hash-Functions ourselfs. There is a very good library for using Hash-Functions in Python already included called hashlib.
So the first thing to do is to import the library:
import hashlib
Now we can define a function with the filename (filepath) as parameter, where we open the file in read mode.
def calculate_md5_checksum(filename):
    with open(filename, 'rb') as file:
Basically we call the Hash-Functions on the hashlib-Library. So we read then the file with 'hashlib.HASH-FUNCTION'. Here we can use every Hash-Algorithm we need right now. I will use in this example the MD5-Hash-Algorithm. The last thing we need to do before we can return the Checksum is to convert it into a Hexnumber. At the end I write it all in Uppercase but you can leave that out. I just do it for aesthatics.
We conclude in a function looking like this:
#Filename as path to data
def calculate_md5_checksum(filename):
    with open(filename, 'rb') as file:
        return hashlib.md5(file.read()).hexdigest().upper()
Basically that was all the magic so it is pretty easy. Next just I made a GUI-Interface and added the most common Hash-Algorithms.
Making a GUI-Interface
I will make the GUI-Interface with Tkinter which is one of the best libraries in Python to create windows and GUI-Interfaces.
So first we will import all needed libraries and set up the main window as well as create two Labels which give the user information on how to use the program:
import tkinter
from tkinter import ttk
from tkinter import filedialog

#Setup: tkinter-Window
main = tkinter.Tk()
main.title("Calculate Checksum")
main.resizable(False, False)
widthWindow = 600
heightWindow = 400
main.geometry(f'{widthWindow}x{heightWindow}')

#Setup: Information-Labels
infoLabel = tkinter.Label(main, text="Here you can calculate the Checksum of a file to see if it's legit and not broken.", font='Helvetica 10 bold')
selectAlgorithmLabel = tkinter.Label(main, text="1. Select the Hash-Algorithm you want to use to calculate the checksum of your file:")

#Mainloop
main.mainloop()
Due to the mainloop()-Method the window remains opened till we manually close it. Notice I also imported 'ttk'. This is an extension to tkinter with more widget and style options we need to use now to create a dropdown menu. In this dropdown menu you can select the type of Hash-Algorithm you want to use. In tkinter we can create a dropdown menu with the element called Combobox:
#Setup: Selection Combobox/Dropdown Menu
hashAlgorithms = ['MD5', 'SHA1', 'SHA256', 'SHA224', 'SHA384', 'SHA512'] #A list of all options in the dropdown menu
comboboxVar = tkinter.StringVar() #Define the type of variable
comboboxVar.set('MD5') #Set the standardized option to MD5
comboboxHashAlgorithms = ttk.Combobox(main, textvariable=comboboxVar, values=hashAlgorithms)
Next we need to create the button with whom you can calculate and also an Exit-Button so we have a way to exit the window and break the mainloop()-Process. Also I created the button the user clicks to select a file. Last I created to Labels you can display if a file is selected and a Label that says the user to select a file if there isn't any file selected:
#Setup: Functional Label
fileLabel = tkinter.Label(main, text="No file chosen")
errorLabel = tkinter.Label(main, text="YOU NEED TO CHOSE A FILE")

selectFileButton = tkinter.Button(main, text='Select File', width=25, command=select_file)
calculateButton = tkinter.Button(main, text='Calculate Checksum', width=25, bg="green", fg="white", command=calculate)
exitButton = tkinter.Button(main, text='Exit', width=25, bg="red", fg="white", command=main.destroy)
Then we place all elements on their position in the window. I will use the place()-Method here. Of course you can use pack() or grid(). If you want. I just like the place system with relative x and y values because the you have like a structured overlay:
#Placing Elements
infoLabel.place(relx=0.5, rely=0.1, anchor="center")
selectAlgorithmLabel.place(relx=0 , rely=0.2)
comboboxHashAlgorithms.place(relx=0.5 , rely=0.3, anchor="center")
selectFileLabel.place(relx=0 , rely=0.4)
selectFileButton = tkinter.Button(main, text='Select File', width=25, command=select_file).place(relx=0.5 , rely=0.5, anchor="center")
fileLabel.place(relx=0.5, rely=0.6)
calculateButton = tkinter.Button(main, text='Calculate Checksum', width=25, bg="green", fg="white", command=calculate)
calculateButton.place(relx=0.5 , rely=0.7, anchor="center")
errorLabel.place_forget() #Making the errorLabel invisible
exitButton = tkinter.Button(main, text='Exit', width=25, bg="red", fg="white", command=main.destroy).place(x=(widthWindow/2)-100 ,y=heightWindow-30)
So lastly we create two functions for the selectFileButton and the calculateButton. The function for the exitButton is obviously main.destroy so we can close the window. The function that is called by the selectFileButton uses the filedialog imported at the beginning of the program. The filedialog opens a window where you can select a file and it returns the filepath which I save in a variable. Because it is complicated to exchange or return variables from a function called by a button I chose to just display the whole path as information on the window in order to be able to pass the path through the text of the Label between the functions (because obviously I need in the calculate()-Function the path so I can call the Hash-Algorithms on the file). So I also edited the text of the Label (created before) to show the filepath and if none is selected it shows the default text "No file chosen":
def select_file():
    file = filedialog.askopenfilename(parent=main, title='Select File')
    fileLabel.config(text=str(f'File chosen: {file}'))
Last but not least we need a function that combines all of the above and calculates the Checksum of a chosen file with the chosen Hash-Algorithm, which I just called calculate(). First we get the text of the Label we put in the path of the chosen file (#1) we want the Checksum of and check if a file is selected by checking if the text is still the same as the default text (#2). If that is the case we display the errorLabel to tell the user to select a file (#3). If the user selected a file we just make the errorLabel invisible (#4)(if it is already it just remains invisible) and get the filepath by spliting the informationtext before the path we displayed in the fileLabel away and only getting the path (#5). Now we get the Hash-Algoritm by getting the input of the Combobox (#6) and calculate the Checksum by calling the function of the selected Hash-Algorithm. Lastly we open a new tkinter window (this time named root) as before (#7) and set the title to the Hash-Algorithm used and selected by the user (#8). Here we create a text where we insert the calculated Checksum (#9). Why do we use this time the 'tkinter.Text' widget? That is because you cannot copy the text out of a Label but out of a Text you can. And we want the user to be able to copy the Checksum so the user can compare it to another Checksum. We now create then an exitButton so the window with the Checksum can be closed to:
def calculate():
    text = fileLabel.cget("text") #1
    if text == "No file chosen" or text == "File chosen: ": #2
        errorLabel.place(relx=0.5, rely=0.8, anchor="center") #3
    else:
        errorLabel.place_forget() #4
        filepath = text.split(": ")[1] #5
        hashAlgoritm = comboboxVar.get() #6
        if hashAlgoritm == "MD5":
            checksum = calculate_md5_checksum(filepath)
        elif hashAlgoritm == "SHA1":
            checksum = calculate_sha1_checksum(filepath)
        elif hashAlgoritm == "SHA256":
            checksum = calculate_sha256_checksum(filepath)
        elif hashAlgoritm == "SHA224":
            checksum = calculate_sha224_checksum(filepath)
        elif hashAlgoritm == "SHA384":
            checksum = calculate_sha384_checksum(filepath)
        elif hashAlgoritm == "SHA512":
            checksum = calculate_sha512_checksum(filepath)
        root = tkinter.Tk() #7
        root.title(f'{hashAlgoritm} Checksum') #8
        root.resizable(False, False)
        widthWindow = 400
        heightWindow = 200
        root.geometry(f'{widthWindow}x{heightWindow}')
        displayChecksum = tkinter.Text(root, height=8, borderwidth=0)
        displayChecksum.insert(1.0, checksum) #9
        displayChecksum.pack()
        displayChecksum.configure(state="disabled")
        exitButton2 = tkinter.Button(root, text='Exit', width=25, bg="red", fg="white", command=root.destroy)
        exitButton2.pack()
        root.mainloop()
We conclude with a layout for the normal window looking like this:

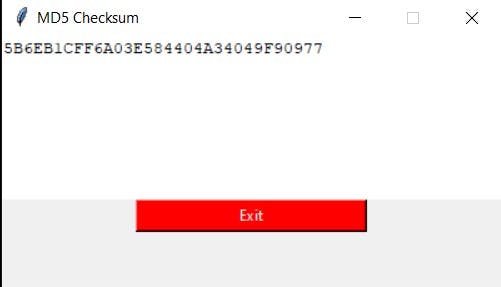
And the window that shows the Checksum looking like this:
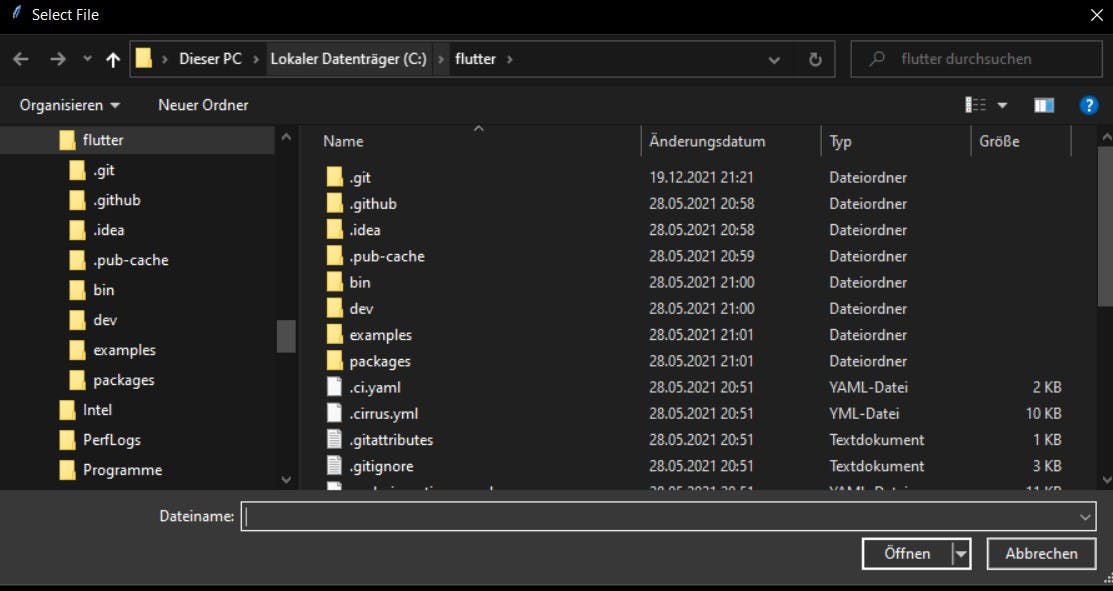
By the way a filedialog is this:
And I also have here the final complete code where all things are combinded:
import hashlib
import tkinter
from tkinter import ttk
from tkinter import filedialog

#Filename as path to data
def calculate_md5_checksum(filename):
    with open(filename, 'rb') as file:
        return hashlib.md5(file.read()).hexdigest().upper()

def calculate_sha1_checksum(filename):
    with open(filename, 'rb') as file:
        return hashlib.sha1(file.read()).hexdigest().upper()

def calculate_sha256_checksum(filename):
    with open(filename, 'rb') as file:
        return hashlib.sha256(file.read()).hexdigest().upper()

def calculate_sha224_checksum(filename):
    with open(filename, 'rb') as file:
        return hashlib.sha224(file.read()).hexdigest().upper()

def calculate_sha384_checksum(filename):
    with open(filename, 'rb') as file:
        return hashlib.sha384(file.read()).hexdigest().upper()

def calculate_sha512_checksum(filename):
    with open(filename, 'rb') as file:
        return hashlib.sha512(file.read()).hexdigest().upper()

def select_file():
    file = filedialog.askopenfilename(parent=main, title='Select File')
    fileLabel.config(text=str(f'File chosen: {file}'))

def calculate():
    text = fileLabel.cget("text")
    if text == "No file chosen" or text == "File chosen: ":
        errorLabel.place(relx=0.5, rely=0.8, anchor="center")
    else:
        filepath = text.split(": ")[1]
        hashAlgoritm = comboboxVar.get()
        if hashAlgoritm == "MD5":
            checksum = calculate_md5_checksum(filepath)
        elif hashAlgoritm == "SHA1":
            checksum = calculate_sha1_checksum(filepath)
        elif hashAlgoritm == "SHA256":
            checksum = calculate_sha256_checksum(filepath)
        elif hashAlgoritm == "SHA224":
            checksum = calculate_sha224_checksum(filepath)
        elif hashAlgoritm == "SHA384":
            checksum = calculate_sha384_checksum(filepath)
        elif hashAlgoritm == "SHA512":
            checksum = calculate_sha512_checksum(filepath)
        root = tkinter.Tk()
        root.title(f'{hashAlgoritm} Checksum')
        root.resizable(False, False)
        widthWindow = 400
        heightWindow = 200
        root.geometry(f'{widthWindow}x{heightWindow}')
        displayChecksum = tkinter.Text(root, height=8, borderwidth=0)
        displayChecksum.insert(1.0, checksum)
        displayChecksum.pack()
        displayChecksum.configure(state="disabled")
        exitButton2 = tkinter.Button(root, text='Exit', width=25, bg="red", fg="white", command=root.destroy)
        exitButton2.pack()
        root.mainloop()


#Setup: tkinter-Window
main = tkinter.Tk()
main.title("Calculate Checksum")
main.resizable(False, False)
widthWindow = 600
heightWindow = 400
main.geometry(f'{widthWindow}x{heightWindow}')

#Setup: Information-Labels
infoLabel = tkinter.Label(main, text="Here you can calculate the Checksum of a file to see if it's legit and not broken.", font='Helvetica 10 bold')
selectAlgorithmLabel = tkinter.Label(main, text="1. Select the Hash-Algorithm you want to use to calculate the checksum of your file:")
selectFileLabel = tkinter.Label(main, text="2. Select the File you want the checksum of:")

#Setup: Selection Combobox/Dropdown Menu
hashAlgorithms = ['MD5', 'SHA1', 'SHA256', 'SHA224', 'SHA384', 'SHA512']
comboboxVar = tkinter.StringVar()
comboboxVar.set('MD5')
comboboxHashAlgorithms = ttk.Combobox(main, textvariable=comboboxVar, values=hashAlgorithms)

#Setup: Functional Label
fileLabel = tkinter.Label(main, text="No file chosen")
errorLabel = tkinter.Label(main, text="YOU NEED TO CHOSE A FILE")

#Placing Elements
infoLabel.place(relx=0.5, rely=0.1, anchor="center")
selectAlgorithmLabel.place(relx=0 , rely=0.2)
comboboxHashAlgorithms.place(relx=0.5 , rely=0.3, anchor="center")
selectFileLabel.place(relx=0 , rely=0.4)
selectFileButton = tkinter.Button(main, text='Select File', width=25, command=select_file).place(relx=0.5 , rely=0.5, anchor="center")
fileLabel.place(relx=0, rely=0.6)
calculateButton = tkinter.Button(main, text='Calculate Checksum', width=25, bg="green", fg="white", command=calculate)
calculateButton.place(relx=0.5 , rely=0.7, anchor="center")
errorLabel.place_forget()
exitButton = tkinter.Button(main, text='Exit', width=25, bg="red", fg="white", command=main.destroy).place(x=(widthWindow/2)-100 ,y=heightWindow-30)

#Mainloop
main.mainloop()
Converting it to an EXE-File
To conclude I used auto-py-to-exe which gives you a cool UI you can use for converting a py-File to an exe.
To use it first you need to install:
pip install pyinstaller
And then you need to install:
pip install auto-py-to-exe
If now you want to start auto-py-to-exe you just need to type:
auto-py-to-exe
in your console and now auto-py-to-exe opens a UI you can use.
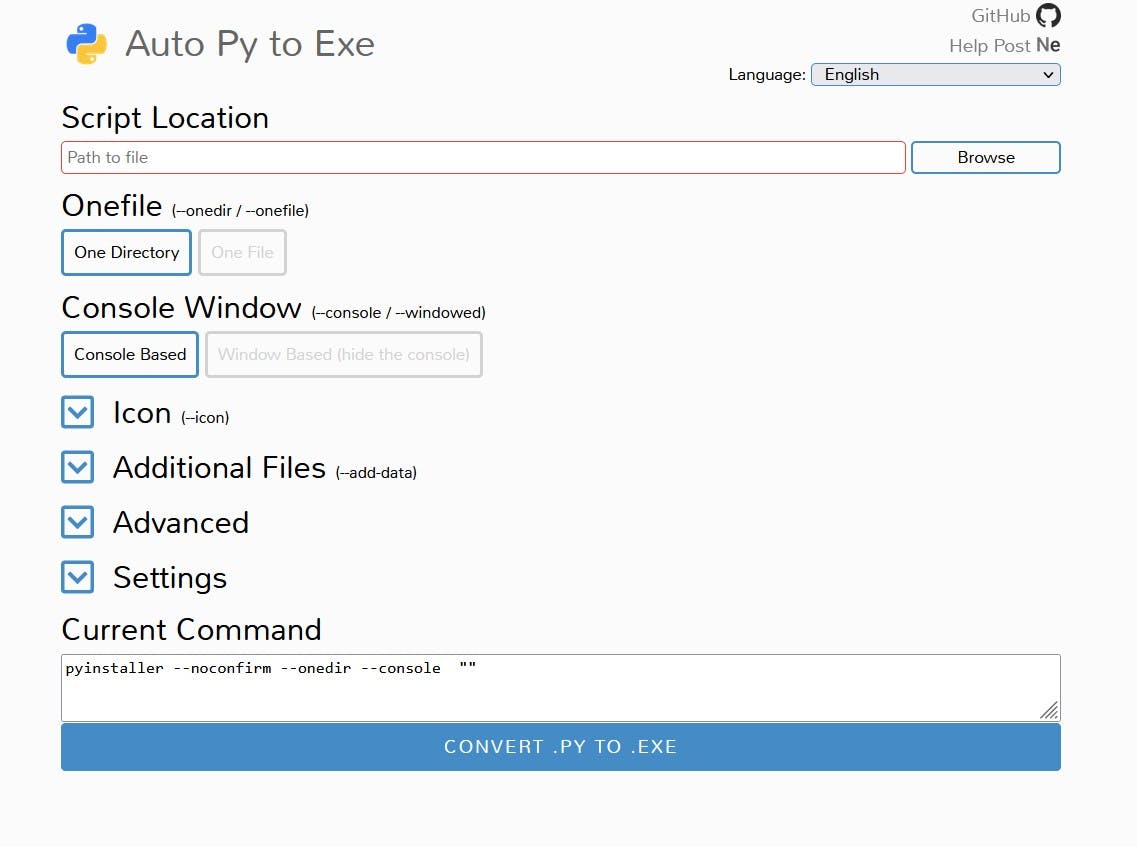
Note: At the bottom you can see 'Current Command'. In Fact the library pyinstaller is the library to convert py-Files to exe-Files but auto-py-to-exe samples everything for you together so you don't need to learn everything about pyinstaller and just click together the properties of your exe-File and auto-py-to-exe does the rest for you.
Conclusion
All in all that was everything. You can as always improve as exercise for you Python Skills the program by coding a cooler and better UI and place all things at the right and better places. Just play a bit with the program to see how everything works and get better at Python.
Hope this post was entertaining or helpful.
See ya adios
Ya fellow human DA.