

Hello there world. I am pissed. I just made this whole tutorial on making GUI and calculating all things and I accidently closed the fucking window. Bloody hell. Remake it now. Damn. Why. Just why.
Throughout many other things I am doing right now one goal I wanna achieve till summer is to get my driver's licence. In Germany we have the system that one first need to do 14 hours of theory in driving before you can do your theory exam and around 12-14 hours of practical driving before you can do your practical driving exam. I actually have done all of the theory hours I need, but at my driving school you need to pass two theory test exams before actually beeing able to do the practical hours. Despite I needed to do all the other stuff I need to do rigth now I decided to move all that to a future time and code a program that helps me learn for this theory-test.
Idea
In theory there are several formulas we need to know in the exams so we can calculate at which distance wthe car would stop if we did use the brake. Thats a pretty dumb system cause never ever will anyone use these formulas in real life so it's just someone needs to know for the exam.
Formulas
With these formulas the distance a car travells while braking can be calculated. All the Speeds are in Kilometers per hour so the distances that are calculated are in meters.
The Reaction Distance
So at first we have the Reaction Distance. This is the distance your car surpasses/travells with the speed your currently driving at during the time you need to react to a change in the traffic or the road before braking. It's a pretty easy equation.
This is calculated by dividing the speed your driving with with 10 and multiplying all that with 3:
d -> Reaction Distance
v -> Velocity/Speed of the car
In Python Code
def reaction_distance(v):
    return (v/10)*3
The Braking Distance
The Braking Distance is the distance the car travells while someone is braking There are two types of this distance.
1. Normal braking
The equation for normal braking, when someone breaks just slowly and carefully to reduce his speed or because of other conditions is pretty easy as well.
Its just again the velocity divided by 10, then squared and then divided by two:
d -> BrakingDistance
v -> Velocity/Speed of the car
In Python Code
def braking_distance(v, isEmergencyBraking):
    if isEmergencyBraking == False:
        return (v/10)*(v/10)
2. Emergency Braking
The Emergency Braking is the braking where you just put your foot on the brake and yeet it as much as possible. Often used to prevent car accidents. For this we just add a variable in which we can choose if it's one or not.
The distance is calulated by just dividing the distance of a normal braking by 2.
d -> Braking Distance with Emergency Braking
v -> Velocity/Speed of the car
In Python Code
def braking_distance(v, isEmergencyBraking):
    if isEmergencyBraking == False:
        return (v/10)*(v/10)
    elif isEmergencyBraking == True:
        return ((v/10)*(v/10))/2
Actual Stopping Distance
That is the distance after which the car stops from the time actually seeing a change in a traffic till the car stands still. For calculating this the Reaction Distance and the Braking Distance are just added together.
In Python Code
def stopping_distance(v, isEmergencyBraking):
    return reaction_distance(v) + braking_distance(v, isEmergencyBraking)
Making a GUI Interface
Because it would be boring to just type in the code the distances and just get the distances get printed out we just make a GUI. For doing this I will use the pre-installed library tkinter. It is very powerful for doing things with windows and GUIs in Python so if you haven't heard of it you should learn how to work with tkinter.
First we are importing the library and setting up a window. Due to the mainloop()-Method the window remains opened till we manually close it.
#Setup: tkinter-Window
main = tkinter.Tk()
main.title("Calculate Distances")
widthWindow = 745
heightWindow = 400
main.geometry(f'{widthWindow}x{heightWindow}')

#Mainloop
main.mainloop()
Next we set up all the labels with information for the user:
#Setup: Information-Labels
explanation = tkinter.Label(main, text="To calculate the distances you just need to type in the speed you are going with and press the Calculate-Button. It will calculate all distances.")
speedLabel = tkinter.Label(main, text="Speed (km per h)")
emergencyBrakeLabel = tkinter.Label(main, text="Is it an emergency braking?")
And of course the labels we will output the calculated distances:
#Setup: Output-Labels
reactionDistanceLabel = tkinter.Label(main, text="Reaction Distance: 0.0 Meters", bg="green", fg="white")
brakingDistanceLabel = tkinter.Label(main, text="Braking Distance: 0.0 Meters", bg="green", fg="white")
stoppingDistanceLabel = tkinter.Label(main, text="Stopping Distance: 0.0 Meters", bg="green", fg="white")
Now we create the entry-Fields for the users to put in the velocity and select if it is an emergency braking or not.
#Setup: Entrys
entrySpeedVar = tkinter.IntVar()
entrySpeed = tkinter.Entry(main, textvariable=entrySpeedVar)

entryEmergencyBrakeVar = tkinter.BooleanVar()
entryEmergencyBrake = tkinter.Checkbutton(main, variable=entryEmergencyBrakeVar)
Now we place all things at their position in the window. I used the place()-Method. Of course you can use pack() or grid() too.
#Heights of "Rows"
height1 = 50
height2 = 100
height3 = 150
height4 = 200
height5 = 250
height6 = 300
height7 = 350

#Placing all elements
explanation.place(x=0 ,y=0)
speedLabel.place(x=(widthWindow/2)-170 ,y=height1)
entrySpeed.place(x=(widthWindow/2)-50 ,y=height1)
emergencyBrakeLabel.place(x=(widthWindow/2)-170 ,y=height2)
entryEmergencyBrake.place(x=(widthWindow/2) , y=height2)
calcButton = tkinter.Button(main, text='Calculate', width=25, command=show_calculated).place(x=(widthWindow/2)-100 ,y=height3)
endButton = tkinter.Button(main, text='Exit', width=25, command=main.destroy).place(x=(widthWindow/2)-100 ,y=height4)
reactionDistanceLabel.place(x=(widthWindow/2)-170, y=height5)
brakingDistanceLabel.place(x=(widthWindow/2)-170, y=height6)
stoppingDistanceLabel.place(x=(widthWindow/2)-170, y=height7)
Notice the Calculate-Button has as command the function show_calculated. This is the last thing remaining to code:
#Calculating
def show_calculated():
#Getting the Typed in Velocity
    v = entrySpeedVar.get()
#Getting the value of the emergency braking
    isEmergencyBraking = entryEmergencyBrakeVar.get()
#Calculating by using our methods
    reactionDistance = reaction_distance(v)
    brakingDistance = braking_distance(v, isEmergencyBraking)
    stoppingDistance = stopping_distance(v, isEmergencyBraking)
#Change the Text of the Labels by writing the distance
    reactionDistanceLabel.config(text=str(f'Reaction Distance: {reactionDistance} Meters'))
    brakingDistanceLabel.config(text=str(f'Braking Distance: {brakingDistance} Meters'))
    stoppingDistanceLabel.config(text=str(f'Stopping Distance: {stoppingDistance} Meters'))
All in all the complete code concludes in looking like this:
import tkinter

def reaction_distance(v):
    return (v/10)*3

def braking_distance(v, isEmergencyBraking):
    if isEmergencyBraking == False:
        return (v/10)*(v/10)
    elif isEmergencyBraking == True:
        return ((v/10)*(v/10))/2

def stopping_distance(v, isEmergencyBraking):
    return reaction_distance(v) + braking_distance(v, isEmergencyBraking)

#Setup: tkinter-Window
main = tkinter.Tk()
main.title("Calculate Distances")
widthWindow = 745
heightWindow = 400
main.geometry(f'{widthWindow}x{heightWindow}')

#Setup: Information-Labels
explanation = tkinter.Label(main, text="To calculate the distances you just need to type in the speed you are going with and press the Calculate-Button. It will calculate all distances.")
speedLabel = tkinter.Label(main, text="Speed (km per h)")
emergencyBrakeLabel = tkinter.Label(main, text="Is it an emergency braking?")

#Setup: Output-Labels
reactionDistanceLabel = tkinter.Label(main, text="Reaction Distance: 0.0 Meters", bg="green", fg="white")
brakingDistanceLabel = tkinter.Label(main, text="Braking Distance: 0.0 Meters", bg="green", fg="white")
stoppingDistanceLabel = tkinter.Label(main, text="Stopping Distance: 0.0 Meters", bg="green", fg="white")

#Setup: Entrys
entrySpeedVar = tkinter.IntVar()
entrySpeed = tkinter.Entry(main, textvariable=entrySpeedVar)

entryEmergencyBrakeVar = tkinter.BooleanVar()
entryEmergencyBrake = tkinter.Checkbutton(main, variable=entryEmergencyBrakeVar)

#Heights of "Rows"
height1 = 50
height2 = 100
height3 = 150
height4 = 200
height5 = 250
height6 = 300
height7 = 350

#Calculating
def show_calculated():
    v = entrySpeedVar.get()
    isEmergencyBraking = entryEmergencyBrakeVar.get()
    reactionDistance = reaction_distance(v)
    brakingDistance = braking_distance(v, isEmergencyBraking)
    stoppingDistance = stopping_distance(v, isEmergencyBraking)
    reactionDistanceLabel.config(text=str(f'Reaction Distance: {reactionDistance} Meters'))
    brakingDistanceLabel.config(text=str(f'Braking Distance: {brakingDistance} Meters'))
    stoppingDistanceLabel.config(text=str(f'Stopping Distance: {stoppingDistance} Meters'))

#Placing all elements
explanation.place(x=0 ,y=0)
speedLabel.place(x=(widthWindow/2)-170 ,y=height1)
entrySpeed.place(x=(widthWindow/2)-50 ,y=height1)
emergencyBrakeLabel.place(x=(widthWindow/2)-170 ,y=height2)
entryEmergencyBrake.place(x=(widthWindow/2) , y=height2)
calcButton = tkinter.Button(main, text='Calculate', width=25, command=show_calculated).place(x=(widthWindow/2)-100 ,y=height3)
endButton = tkinter.Button(main, text='Exit', width=25, command=main.destroy).place(x=(widthWindow/2)-100 ,y=height4)
reactionDistanceLabel.place(x=(widthWindow/2)-170, y=height5)
brakingDistanceLabel.place(x=(widthWindow/2)-170, y=height6)
stoppingDistanceLabel.place(x=(widthWindow/2)-170, y=height7)

#Mainloop
main.mainloop()
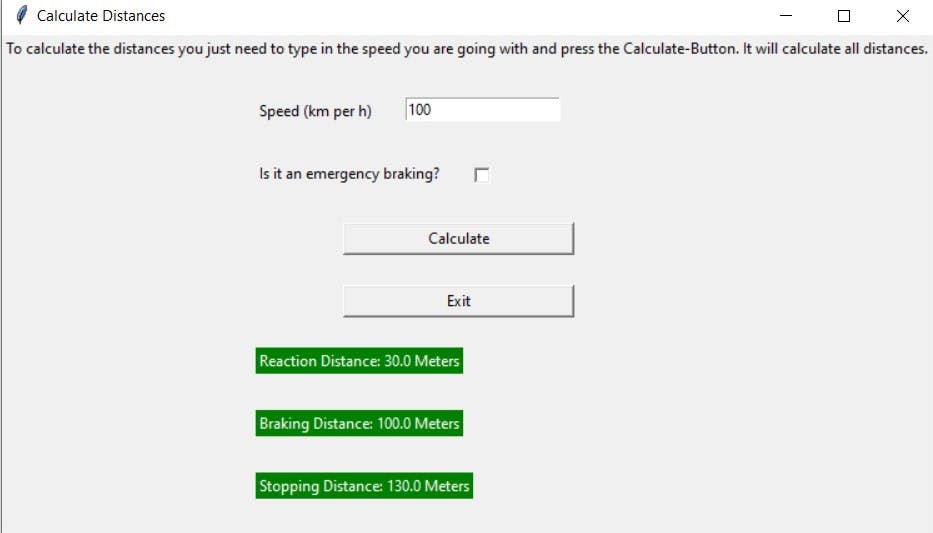
And the GUI like this:
Converting it to an EXE-File
To conclude I used auto-py-to-exe which gives you a cool UI you can use for converting a py-File to an exe.
To use it first you need to install:
pip install pyinstaller
And then you need to install:
pip install auto-py-to-exe
If now you want to start auto-py-to-exe you just need to type:
auto-py-to-exe
in your console and now auto-py-to-exe opens a UI you can use.
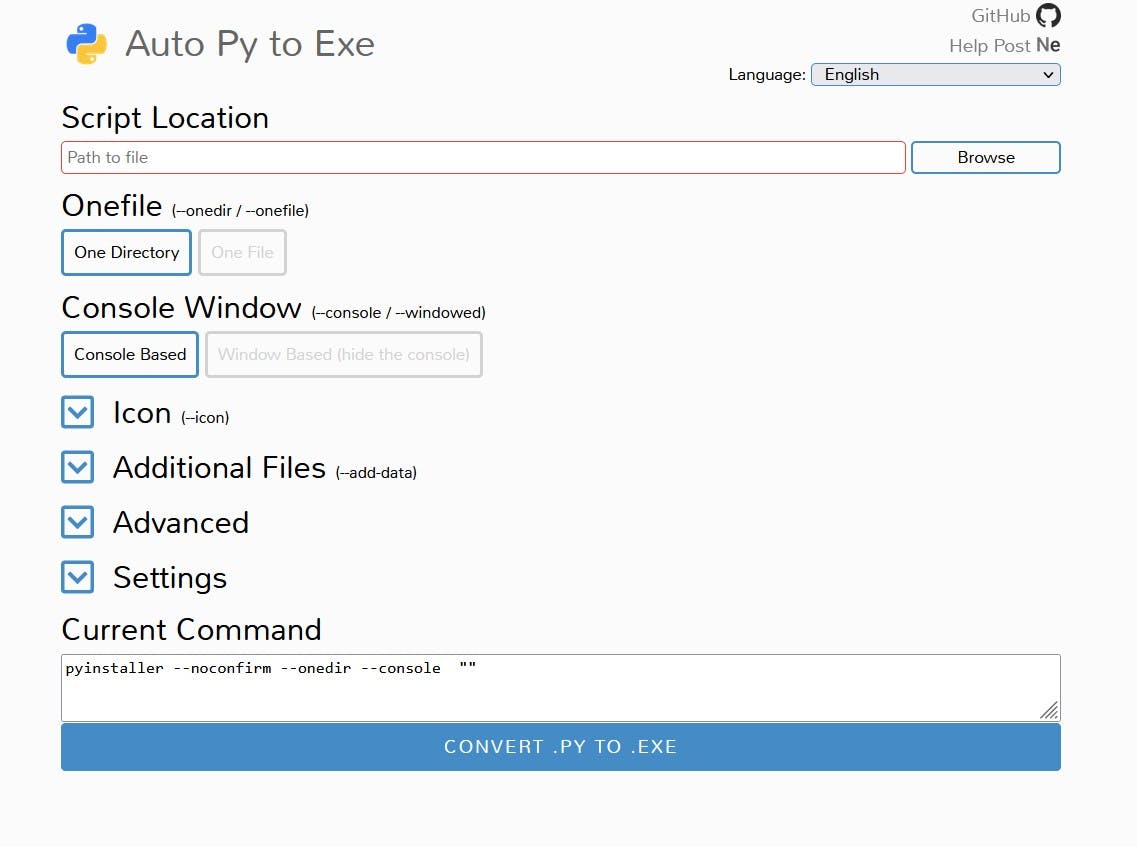
Note: At the bottom you can see 'Current Command'. In Fact the library pyinstaller is the library to convert py-Files to exe-Files but auto-py-to-exe samples everything for you together so you don't need to learn everything about pyinstaller and just click together the properties of your exe-File and auto-py-to-exe does the rest for you.
Conclusion
Now you can get creative and remake the program on this basis as little exercise for your tkinter-Skills. Get creative and design it cooler or add functions like for example an information button that shows all information on how the distances are calculated or even a whole program you can learn with for the driver's licence or whatever you like.
Hope this post was entertaining or helpful.
See ya and ciao
Ya fellow human DA.